Free Standard Shipping on Orders $25+ Continental USA only
Shipping to Alaska, Hawaii, and International shipping to Canada extra. Please place the order and factory will advise of additional shipping amounts prior to shipping.
Credit Cards will not be charged until shipping amounts are verified.
Expedited shipping available. Please call for pricing.
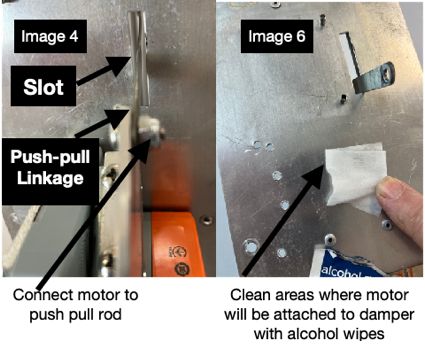
6. Clean the areas where the motor will be attached to the damper with the provided alcohol wipes. The alcohol will remove any dust and debris and allow for a secure attachment of the motor to the damper. See Image 6.
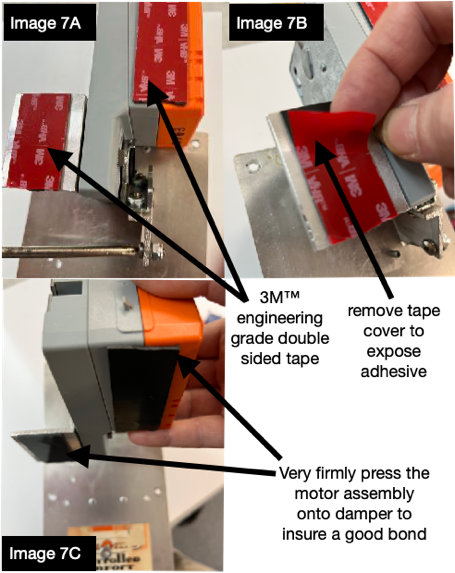
7. Center the push pull damper linkage in its slot, and “Test Mount” the motor by placing the motor on the damper. Now, using the motor clutch, rotate the motor and push pull linkage to insure it does not drag or touch any side of the slot. Reposition as needed and mark where the motor will be placed. Remove the 3M™ engineering grade double sided tape cover to expose the motor adhesive and ensure the position is correct. Then very firmly press the motor assembly onto damper to insure a good bond. See Images 7A ,7B, and 7C.
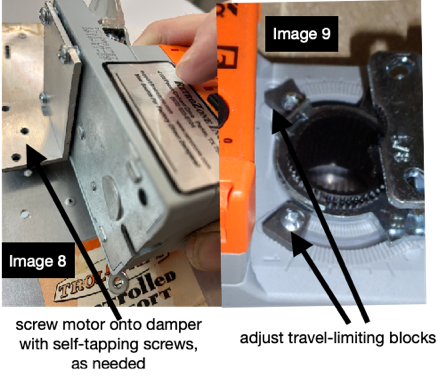
8. If the damper does not have a good, clean mounting surface due to old caulk, labels, or other residue, please use the included self tapping screws to more firmly attach the motor to the damper.
See Image 8.
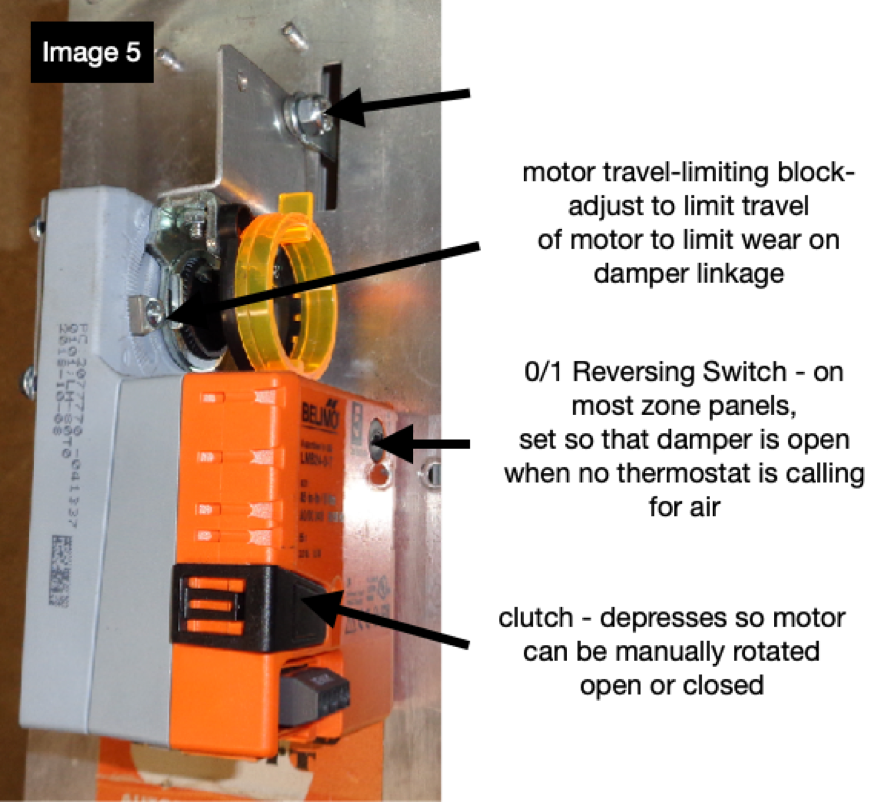
9. Note that there are travel-limiting blocks that should be adjusted. This limits the travel of the powerful motor to avoid damage or increased wear to damper linkage. To adjust the travel-limiting blocks, depress the black clutch button on motor and rotate motor fully open to fully closed. With a screw driver, observing the black marks on push-pull shaft made earlier, adjust travel-limiting blocks to stop motor
travel just slightly before damper is fully open or closed. The installer can also use these same travel-limiting blocks to allow any amount of damper leakage desired, which was not possible with the OEM motor being replaced. See Image 9.
10. Connecting to zone panels or thermostats. The Belimo LMB24 motor needs only 3 wires to operate.
On many Trol-a-Temp and EWC panels, from panel to motor terminals: M1 to motor terminal 1, M4 to motor terminal 2, and M6 to motor terminal 3. If you had a jumper from 2 to 5 on the old motor, you may need to add a jumper between 2 and 5 at the panel, if your panel has a 2 and 5.
On zone panels with damper outputs marked Common (C), Normally Open (NO) or Normally Closed (NC): C to Motor 1, NO to motor 2, and NC to motor 3.
Motors connected directly to thermostats: Thermostat Common (24v-) to motor 1, Thermostat R (24v+) to motor 2, Thermostat Y jumpered to W and then to motor 3.
Notes: On most modern zone panels, dampers should open when there is no call for heat and air, i.e., the HVAC system is at rest. If the motor closed the damper when the system is at rest, use the 0/1 reversing switch to cause damper to open.
The RetroZone™ LMB24 Kit3 is a Belimo-powered kit designed to replace the discontinued Honeywell Trol-A-Temp MSTN and EWC MAN motors.
QUICK START GUIDE - NOW WITH NO DRILL NEEDED.
SIMPLE REPLACEMENT OF TROL-A-TEMP MSTN OR EWC MAN MOTOR:
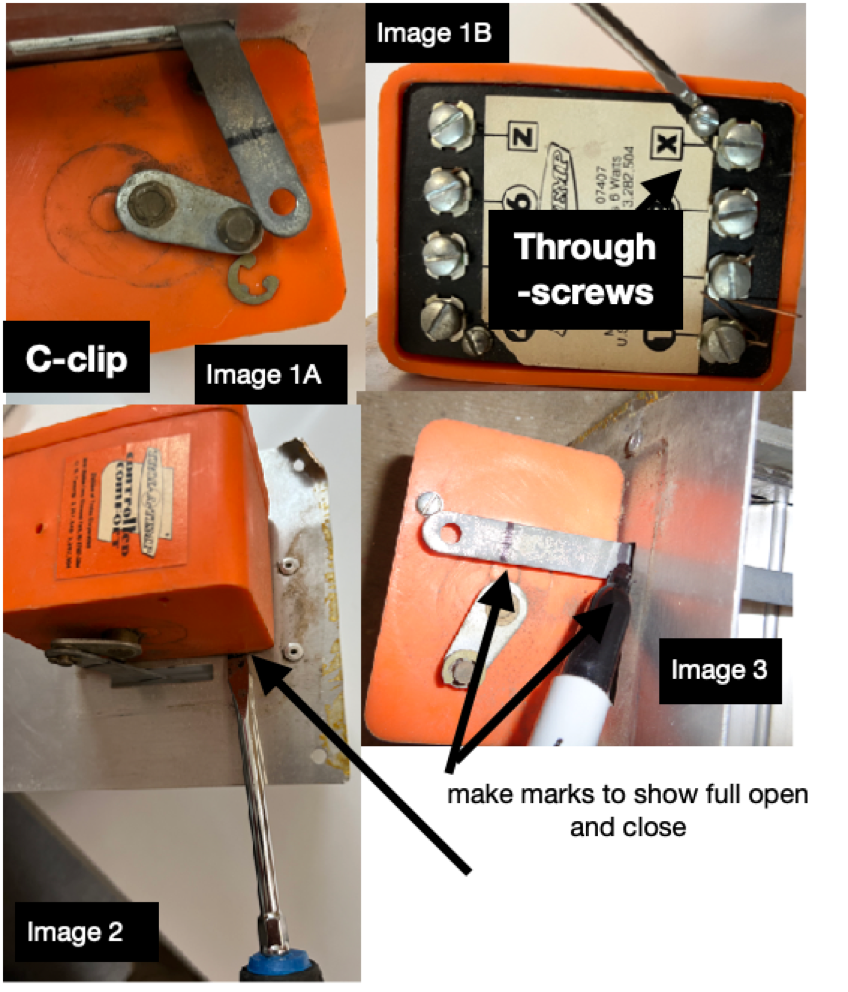
Remove C-clip holding push pull rod to motor. (1A). Mark full open and full close positions. (3)
Carefully pry off old orange or blue plastic motor and housing. (2) Remove old motor first, if desired. (1B)
Attach new motor to push pull rod with hardware. (4)
Use alcohol wipes to clean damper mounting surfaces. (6)
Remove protective covering from 3M™engineering grade double sided tape on motor bracket. (7A, 7B)
Lightly mount motor to damper while centering push pull rod in slot. (7C)
Firmly press after insuring push pull rod does not contact slot. (5, 7C)
Adjust and wire.
FULL INSTRUCTIONS - INSTALLATION:
CAUTION - Disconnect power supply before connecting motor wiring to prevent electrical shock or equipment damage.
Detach motor from inside of plastic case by removing 2 through-screws. Then disconnect push-pull shaft by removing C-clip. See Images 1A, 1B, and 3.
Carefully locate 3 rivets holding plastic motor case onto damper body; then insert flat head screw driver under rivet and carefully pry plastic case off of damper. See Image 2.
pry plastic case off damper with flat head screwdriver
3. By hand, push in and pull out the push-pull drive shaft to make sure it fully opens, closes, and moves freely. Then, take a marker and mark the full open and full close positions on the push-pull shaft. These marks will be used to help adjust the motor travel when installed. See Image 3.
4. Attach push-pull shaft to bell crank on motor using the the provided hardware and self locking nut, ensuring that the push-pull rod can pivot.
Do not over-tighten, as doing so will prevent the push-pull rod from pivoting.
See Image 4.
5. Using the motor clutch, position the motor drive halfway between open and close. This should help center the push pull rod in the mounting step 7.