WE ARE YOUR 1-STOP INTERNET SOURCE FOR MOTORIZED DAMPERS, REPLACEMENT DAMPER MOTORS, RETROFIT ZONING SYSTEMS AND MORE!


DON’T SEE IT ON OUR WEBSITE? CALL US, WE HAVE A SOLUTION!

Retrozone&Flexdamper are trademarks of Retrozone Inc.

 Free Standard Shipping on Orders $25+ Continental USA only

  Shipping to Alaska, Hawaii, and International shipping to Canada extra. Please place the order and factory will advise of additional shipping amounts prior to shipping. 

Credit Cards will not be charged until shipping amounts are verified. 


Expedited shipping available. Please call for pricing. 

38600L Synchron Belt

 Installation Instructions

Which Damper style do you have?

ROUND DAMPER:

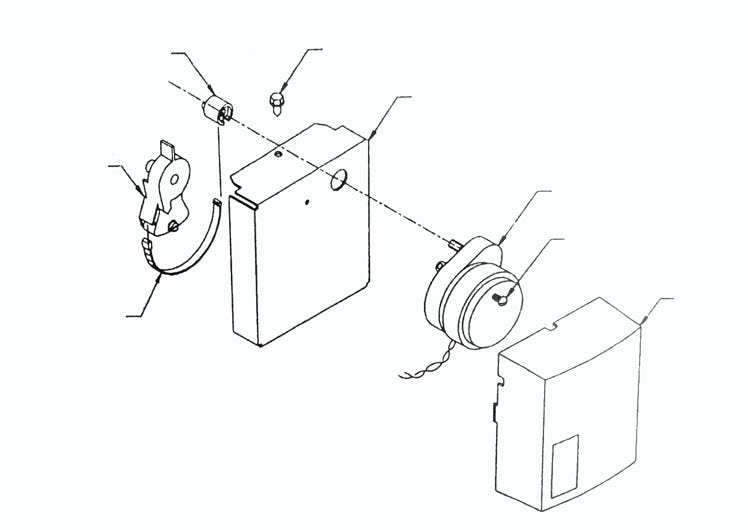
Flex Link Replacement Instructions 

(See Figure 1)

1. Remove plastic motor cover.

2. Remove screw(s) that attach motor to assembly.

3. Remove motor and let it hang by the power wires.

4. Remove the screw(s) that attach the motor bracket to the assembly.

5. Disconnect the Flex Link from the black drive spool and the lever arm. Use care to prevent the lever arm from disengaging from the metal shaft.

6. Install the small cog of the new Flex Link into the black drive spool and the large cog into the lever arm.

7. Re-install the motor support base to the assembly and secure with the original screw(s).

8. Align the flat on the motor drive shaft with the flat in the drive spool and insert the shaft into the spool.

9. Rotate the motor as required to line up the motor mounting hole(s) with the support base and secure with the original screw(s).

10. Re-install the plastic motor cover. 

Lever Arm

Flex Link

Drive Spool

Figure 1 Round Damper

Belimo, commercial grade damper motor belt, hvac, air conditioning supplies, Retrozone, Synchron, 2 wire, spring return, free shipping, 38600L belt

Motor

Motor Support Base Mounting Screw

Motor Bracket

Motor Mounting Screw

Motor Cover

OLD RECTANGULAR DAMPER:

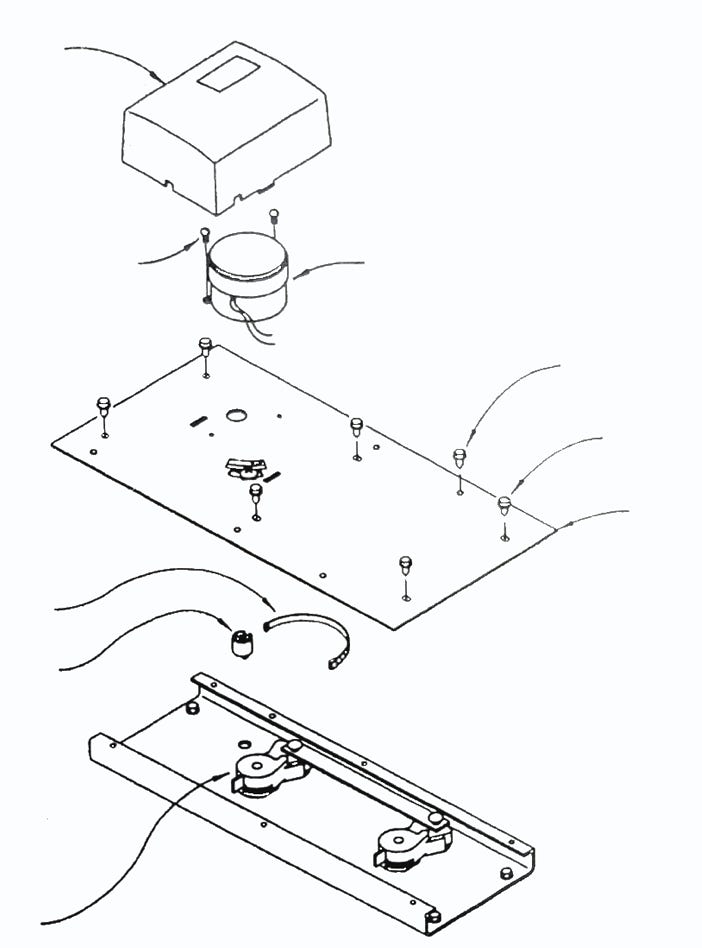
Flex Link Replacement Instructions 

(See Figure 2)

1. Remove plastic motor cover.

2. Remove screw(s) that attach motor to assembly with a Phillips screwdriver.

3. Remove motor and let it hang by the power wires.

4. Remove screws mounted to the duct work.

5. Remove the screw(s) that attach the face plate to the assembly.

6. Disconnect the Flex Link from the black drive spool and the lever arm. Use care to prevent the lever arm from disengaging from the metal shaft.

7. Re-install the drive spool into location hole in assembly.

8. Install the small cog of the new Flex Link into the drive spool and the large cog into the lever arm.

9. Re-install the face plate to the assembly and secure with the original screw(s).

10. Align the flats on the motor drive shaft with the flats in the drive spool and insert the shaft into the spool.

11. Rotate the motor as required to line up the motor mounting hole(s) with the face plate and secure with the original screw(s).

12. Re-install the plastic motor cover.

Figure 2 Old Rectangular Damper

Motor Cover

Motor Mounting Screw

Motor

Flex Link

Drive Spool

Lever Arm

Belimo, commercial grade damper motor belt, hvac, air conditioning supplies, Retrozone, Synchron, 2 wire, spring return, free shipping, 38600L belt

Duct Work Mounting Screw

Face Plate Mounting Screw

Face Plate

NEW RECTANGULAR DAMPER:

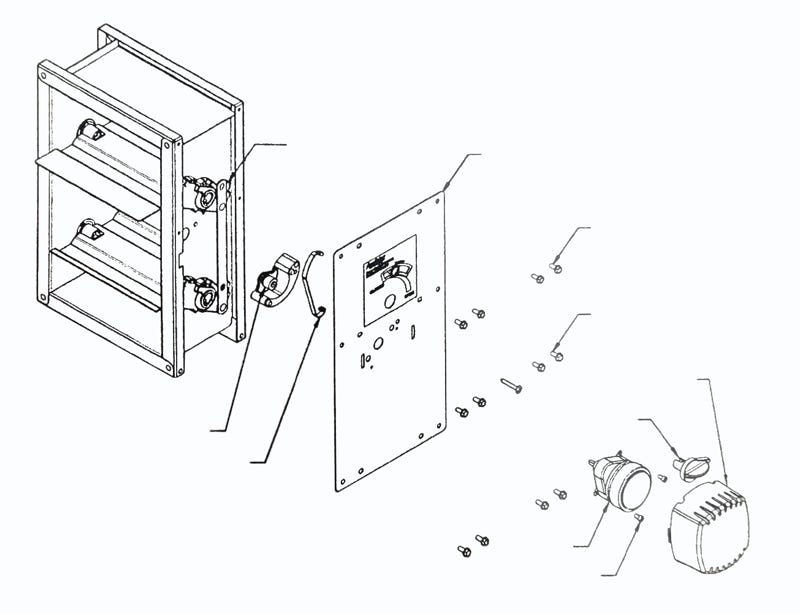
Flex Link Replacement Instructions 

(See Figure 3)

1. Remove plastic motor cover and pull off open-closed indicator.

2. Remove screws that attach motor to assembly and one screw next to motor with a Phillips screwdriver.

3. Remove motor and let it hang by the power wires.

4. Remove screws mounted to the duct work.

5. Remove the screws that attach the face plate to the assembly.

6. Disconnect the Flex Link from the drive spool and the lever arm. Use care to prevent the lever arm from disengaging from the bearing.

7. Re-install the drive spool into location hole in assembly.

8. Install the small cog of the new Flex Link into the drive spool and the large cog into the lever arm.

9. Re-install the face plate to the assembly and secure with the original screw(s).

10. Align the flats on the motor drive shaft with the flats in the drive spool and insert the shaft into the spool.

11. Rotate the motor as required to line up the motor mounting hole(s) with the face plate and secure with the original screw(s).

12. Re-install the plastic motor cover and open-closed indicator.

Belimo, commercial grade damper motor belt, hvac, air conditioning supplies, Retrozone, Synchron, 2 wire, spring return, free shipping, 38600L belt

Lever Arm

Face Plate

Duct Work Mounting Screw

Face Plate Mounting Screw

Motor Cover

Indicator

Motor

Motor Mounting Screw

Figure 3 New Rectangular Damper

This website makes use of cookies. Please see our privacy policy for details.

ACCEPT

Deny